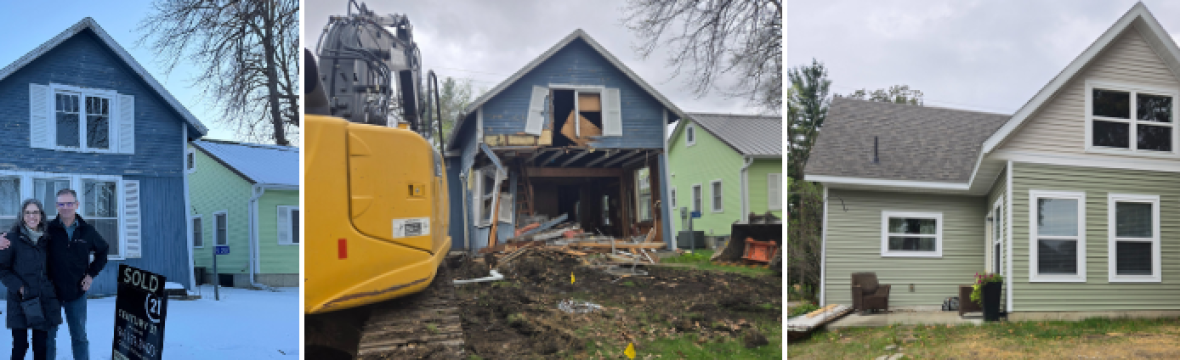

As teachers, we tend to be rule followers. But when it came to our own live-in DIY renovation? We completely failed the Reno 101 assessment. Because we didn’t follow the rules. But wait. We have excuses!
If you read any home improvement manual or watch HGTV, the “proper” construction order is simple: work top to bottom. You do the ceilings, then the walls, then the floors. It makes perfect sense. We even had a plan to do it that way! But somewhere between sleeping in drywall dust, racing the weather, and just trying to survive a live-in renovation, that plan completely vanished.
Here is the naked truth about why our renovation happened completely backwards, and the domino effect of chaotic decisions that got us here.
1. The Domino Effect
It all started with a totally normal, logical step: Frank framed the stud walls for the bathroom and our bedroom because he had leftover lumber from building it. Progress, right? Well, yes, until we realized we had a massive shower unit that needed to go in.
If you’ve never installed a large shower stall, here is a fun fact: they don’t fit through standard finished doors. We had to cut out studs to shove the beast in through the opening. It had to be shoved into the framing immediately before we could do anything else. Because we panicked and had to rush the shower installation, the wall behind it didn’t get insulated accurately. The first domino had officially fallen.
(Also, if you note that the kitchen had cabinets in there already, we had saved them from the original cabin and had them in storage during the demolition. We had to get our items out of the storage unit, so they came into the new build before we got proper steps in the right order. We had to continually move them out of the way as we worked.)


2. The Privacy Panic (And Our Bedsheet Wall)
Once the framing was up, the manuals tell you to move on to rough-in plumbing, electrical, and ceilings. But the manuals don’t account for the fact that when you gut a house you are actively living in, you effectively turn your life into a neighborhood aquarium. And we have a ton of windows in that little place!
Before we could even think about doing things in the “proper” order, we hit a very practical, immediate roadblock: we needed to change our clothes without giving the neighbors a show. Survival mode kicked in. We completely abandoned our timeline and rushed to throw drywall up in the bathroom just to have a single room with actual privacy. For 6 months, our bedroom “wall” was literally just a bedsheet stapled up to block the view from the street.


3. The Exposed Ceiling Plot Twist
If you are reading this and screaming at your screen, “But why didn’t you just put the ceiling drywall up before the walls?!”—here is the real kicker: we never planned to have ceilings at all.
Our original dream was to leave the ceilings exposed. We were just going to paint the bare joists and the OSB board for that cool, rustic cabin vibe. It was going to save us time, money, and a whole lot of heavy lifting. So, we happily proceeded with building our walls and shoving our giant shower into place, thinking the ceiling was basically done.
And then… we found the mold.
That terrifying discovery stopped us in our tracks. We quickly realized that leaving raw OSB board exposed in a house—especially in a damp bathroom—was a terrible idea. So was the improper installation of insulation we put around the shower.
On top of that, we learned that ceiling drywall isn’t just for looks; it acts as a crucial fire and moisture barrier. Suddenly, our trendy “exposed ceiling” dream was dead. We now had to figure out how to wrestle massive sheets of ceiling drywall up in a house where the walls and plumbing were already fully built. Oops.


4. The Reclaimed Wood Shiplap Sanity Project
Meanwhile, right before the great mold discovery ruined our ceiling plans, the changing weather had chased us completely indoors. Pulling wires for electricity and hooking up some plumbing were the next steps. We were exhausted, surrounded by dust, staring up at what we thought were perfectly fine bare ceiling joists, and desperately needed a morale boost.
So, what do you do when your house is structurally chaotic? You build something pretty. (At that time, we hadn’t discovered the mold, and a few of the outlets were wired.) So we broke out the salvaged wood flooring and started building the shiplap wall in the living room. Was it out of order? Completely. But it was a mental health project, not a structural one, and it gave us the shred of sanity we needed to keep going.


The Takeaway
Living in a construction zone forces you to throw the rulebook out the window. You do what you have to do to survive, even if it means doing it completely backwards.If you are crazy enough to tackle a live-in renovation yourself, learn from the teachers who did it all wrong!
Want my free Consequences vs. Payoffs Reality Check checklist? Comment below to see if you are really ready to live in the dust.
1 thought on “✅Lessons Learned From Teachers Who Renovated Completely Backwards”