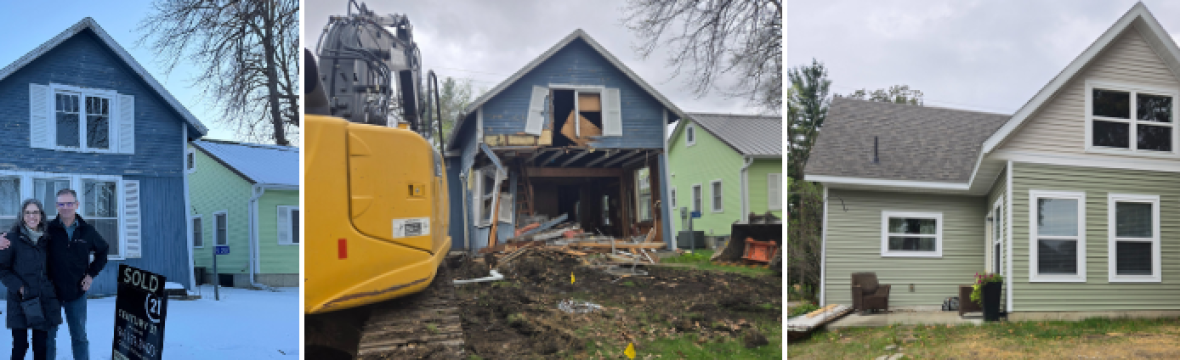

Last week, we celebrated our one-year demolition anniversary by sharing our before and after floor plans — and all the reasons we made such dramatic changes to a cabin that was, in theory, just supposed to be a fixer upper. (If you missed Part 1, start there — it sets the scene for everything that follows.)
This week I’m pulling back the curtain on the messy middle: what we salvaged before the wrecking ball arrived, the permit process that nearly derailed everything, and the budget reality of building something new when your vision is bigger than your wallet.
Spoiler: it was a lot. But we’re still standing. And so is the cabin…at least the new one is!
Demolition is Easy. Preservation is Hard.
We didn’t buy this 1920s church camp cabin with the intention of erasing its history. Even after we made the decision to knock it down, it would have been faster — and cheaper — to let everything go with the demo. But that didn’t feel right.
So before the crew arrived (and while we waited for permit approval) Mike & I got to work.
The Floor That Became a Wall


The upstairs wood flooring was rough, dusty, and covered in a century’s worth of character. We later learned it was likely Old Growth Douglas Fir — the kind of timber widely used in the upper Midwest when this cabin was originally built. We weren’t about to let that go to a dumpster.
We pulled up as many boards as we could, pounded out every nail by hand, power washed off decades of dirt, and stored them in a friend’s unit until the new house was ready. It was slow, physical work — but we had a plan.
My original intention was to paint the boards white for a clean, airy cottage look. But when we started nailing them to the wall in the new house, something shifted. The colors, the knots, the imperfections — this wood had a story. Covering it up felt wrong. And it was actually gorgeous!
So we left it natural. And as a very teacher-on-a-budget bonus, it saved us a significant chunk of change on materials for that feature wall. (although we had to pay to store it, so we maybe didn’t save as much as we like to think. 🤔)
If you want to read more about that process and decision, read these previous posts: The Soul of the Cabin & Salvaging Old Floors
The Cabinets, the Deck Boards, and Other Little Things
The original kitchen cabinets were solid and worth saving — so we did. They found a new home in the rebuilt kitchen and are still in use today. The deck boards were salvaged as well. We thought we would use them on walls inside, but they will become a new wooden patio outside of our bedroom sliding doors. (Click here to read about how we saved $5,000 by salvaging the cabinets)
We also saved a few smaller pieces that felt too meaningful to let go — some of the original windows, a bell, an antique hook, a door knocker shaped like a ship…few personal touches that carry the spirit of the original camp forward into the new build.
The Signatures We Couldn’t Save
When we pulled down the old paneling upstairs, we discovered something we hadn’t expected. Decades of campers had signed their names on the wood underneath — names, dates, hometowns, little phrases. A guestbook built right into the walls. (The old saying “if these walls could talk” was actually true in this case!)
We wanted to save them all. But the roofing nails went straight through the boards and the shingles were stuck fast. We managed to save a few strips. The rest we captured with our cameras, and we plan to display the photos in the new cabin and start a new signature wall to carry the tradition forward.


It’s one of the parts of this journey we think about most. (You can see the signatures here — and if you recognize any names, please reach out. We’d love to find them.) We hope to create a new place for signatures of our guests to carry on the tradition. To see them all, go to this gallery wall.
I would love to learn more about the camper’s stories and the history of the cabin. When I contacted the city and county for historical building permits, I was told that there was NO file for our property until 2025 when we filed our permits. She remembered actually creating the paper file at that time. (you can’t make this small town stuff up!)
What We Donated
Everything we didn’t want to keep — bathroom vanities, toilets, fixtures — we pulled out and delivered to the ReStore. If you aren’t familiar, they resell all kinds of items for homes and building and the funds raised help support Habitat for Humanity. It felt like the right thing to do, and it still does. (We also have some ReStore purchases that we added to the cabin)
The Permit Process: We Were Warned But We Didn’t Really Understand
Here’s something that doesn’t make it into the renovation highlight reels: you can’t just knockdown a house. (I mean, you might be able to, but you might NOT be able to rebuild)
Current building codes require homes to be set back 30 feet from both the front and back of the property. Our lot is only 59 feet deep. Do that math and you’ll quickly realize there’s technically no room to build anything at all. Our lot is officially classified as obsolete. (So, in theory, even if burned down, we wouldn’t be able to rebuild)
Which meant before we could demolish anything, we had to prove we had the legal right to rebuild. That process looked something like this:
We applied for a permit to rebuild. Then we had to get officially denied — because that’s how the process works — before we could apply for a variance. The county only met once a month, so getting denied at the end of March meant our appeal wouldn’t be heard until the end of April. Every step was a waiting game measured in months, not days.
We got denied as planned at the end of March. Meanwhile, Frank had the new house plans drawn up and ready. We thought we also had neighborhood board approval lined up. So while we waited on the official variance, we started doing what we could — carefully salvaging the floors, the cabinets, the windows we wanted to save.
We waited through April only to discover county had forgotten to put our variance appeal on their meeting list. Frank made some calls. The county came through in a matter of days.
And then the phone rang.
Someone in the neighborhood had heard the demo was imminent. And they could tell by seeing the missing windows and deck. They were calling to let us know — we had not actually been approved at the board meeting.
We had to stop. Immediately.
Let me paint you the picture of where we were at that exact moment. The house was partially dismantled. We had already pulled floors, removed sinks, and taken out windows. Our insurance company had informed us they were cancelling our coverage after June 1st because the structure was considered a fire hazard. We couldn’t fix the house — we’d already taken too much apart. We couldn’t finish the demo — we didn’t have approval from the neighborhood association. We were stuck in a very expensive, very stressful limbo.
The neighborhood approval followed shortly after. Demo day was back on — and we had a June 1st insurance deadline to beat.
We made it. But it was closer than we would have liked.
The Budget Reality: Vision VS Wallet
Here’s something we’ve learned about renovation budgets: they’re less like a plan and more like a conversation. A very humbling conversation.
Frank’s original bid to fix the foundation was $12,000. When the scope expanded to include knocking down the addition and rebuilding it, that grew to $20,000. And when he offered to knock down the entire structure and build us something new — new foundation, new plumbing, new everything — that number doubled.
We said yes to the full rebuild. And Frank held to that number throughout the entire project, which was something we are genuinely grateful for.
But Frank’s bid included the structure, roof, windows, and doors. The decisions about finishes, windows, and exterior details? Those were ours to make. And that’s where the real budget conversations began. Compromises had to be made!


The Window Decision
We have 13 windows in the new cabin. Thirteen opportunities to make a decision that added up fast.
My original vision was casement windows with built-in blinds — the kind that look polished and intentional. But the price per window was nearly double what we ultimately paid. So I adjusted. And adjusted.
The next option was double-hung windows with vintage-style grilles, similar to some of the original salvaged windows. Beautiful — but still adding hundreds of dollars per window across thirteen openings.
We dropped the grilles. Then we looked at single-hung windows instead of double-hung and found we actually preferred them — no screen in the upper half means a completely clear, unobstructed view. Sometimes the budget compromise leads you somewhere better than where you started. (or you look for the thing you love about the budget choice you made 😉)
Want some numbers?
Savings from dropping casement: roughly $880+ per window x 13 = over $11,000 saved
Savings from removing grilles alone: $196 per window x 13 windows = $2,548 saved
That’s the kind of math we can get behind!
The Siding Decision
I had my heart set on scalloped siding on all three peaks of the cabin. It’s charming, it’s cottage-y, it felt exactly right for the aesthetic we were going for.
Then we priced it out. The scalloped siding ran more than three times the cost per carton of standard siding. Across three peaks, that difference added up to a significant budget hit — and we still had a lot of cabin left to finish.
Siding cost comparison per carton (3 were needed for all three peaks):
- Regular siding: $160
- Scalloped siding: $506 = $1038 in savings
So we compromised strategically. Vertical siding in a contrasting color on the front peak only — the part everyone sees — with wide, substantial window trim on the front windows to give it charming curb appeal. The sides and back stayed simple.
That decision added a bit to our materials cost compared to going completely plain, but it was a fraction of what full scalloped siding on all three peaks would have been. And since we did all of the installation work ourselves, we could afford to put a little more into the materials that mattered most visually.
Looking back, we’re glad we made those calls. The cabin looks intentional rather than just economical — and it feels like ours in a way that a perfect-budget dream version might not have. Do I still wish I had scalloped siding? Yes. But am I happy with the results? Absolutely! It is still has an adorable cottage vibe!
Coming Next Week: Part 3
Next week we’re wrapping up our demo-versary series with the part I’ve been thinking about the most — the lessons learned. Not the renovation tips (though there are plenty of those), but the real, honest things we know now that we wish we’d known a year ago.
If you’ve been following along from the beginning, Part 3 is the one you won’t want to miss. Subscribe (if you haven’t already) to make sure it lands in your inbox.
Which of these pivots would have been hardest for you? Drop a comment below. 👇

1 thought on “Demo-versary Part 2: What We Salvaged Before the Wrecking Ball (And the Permit Chaos)”